Basic Makeup Look 101
We all dream of waking up in the morning and getting ready in a split second. Maybe you're the lucky girl who has the perfect complexion that everyone wishes for and you put on your makeup simply just for fun and glam. Or maybe you're dealing with some skin troubles; a busy mom who is trying to cover up tired, dark circles or someone who battles with acne. Makeup can help boost your confidence and make you feel put together, and if you’re like me maybe even a little motivated. We shouldn’t hide behind our makeup, but instead, use it to have fun and make ourselves feel good. So let's talk about the basics and how you can create a beautiful everyday look that will be easy and quick and make you feel put together with only a couple of products. These are the basics of quickly getting ready that you can always add more to and bring your everyday look to date night in a flash.
Here are easy steps, tips, and tricks that you can add to your routine. These are NOT rules! If only some of them fit your needs and make your life easier then I was successful with my mission to share and inspire.
Step 0: Hydrate & Prep:
Let's back paddle! Skincare always comes first, I can't stress enough how important your skin care is, so if you need some more guidance then check out my previous article or feel free to reach out to me personally and I'll be more than happy to help. You can find my info below in my bio.
Let's chat about primer. I frequently get asked, “Why do we need a face primer? Is it important??” Primer is often overlooked, but before you go for that gorgeous wing liner and put the statement color on your lips, you should first prep your skin. While it’s not the most exciting part of your pampering routine, applying primer before your base makeup is the best way to smooth out blemishes and even out your all-over appearance. Make primer part of your skincare, it will help you with the longevity of your makeup as well.
Step 1 Foundation:
After you prime, it's time for Foundation, Blemish Balm Cream, or Color-Correcting Cream. Make sure to not only pick the right color of your foundation but also the correct form according to your skin type. Foundations are meant to even out your skin tone and cover all imperfections. Simply give yourself a blank canvas to work with. It can be in the form of liquid, cream, or powder. To find your perfect match, test the color first on your jawline. You don't want your foundation to be lighter or darker than your neck otherwise you'll end up looking like you have on a mask no matter how hard you try to blend. If you feel like it’s too light, don't worry, you will add a little color and dimension with blush and bronzer.
Step 2 Concealer:
Concealers can work wonders by covering up imperfections and dark circles. If you're trying to quickly cover up some spots without color correcting then make sure not to overapply and to blend well. Concealers should match your skin tone, or be one shade lighter if you're trying to brighten under your eyes. Blending is the key. We want to make sure we blur out the imperfections and create the look of flawless skin and not to draw attention to the spot we want to cover.
Step 3 Blush or Bronzer:
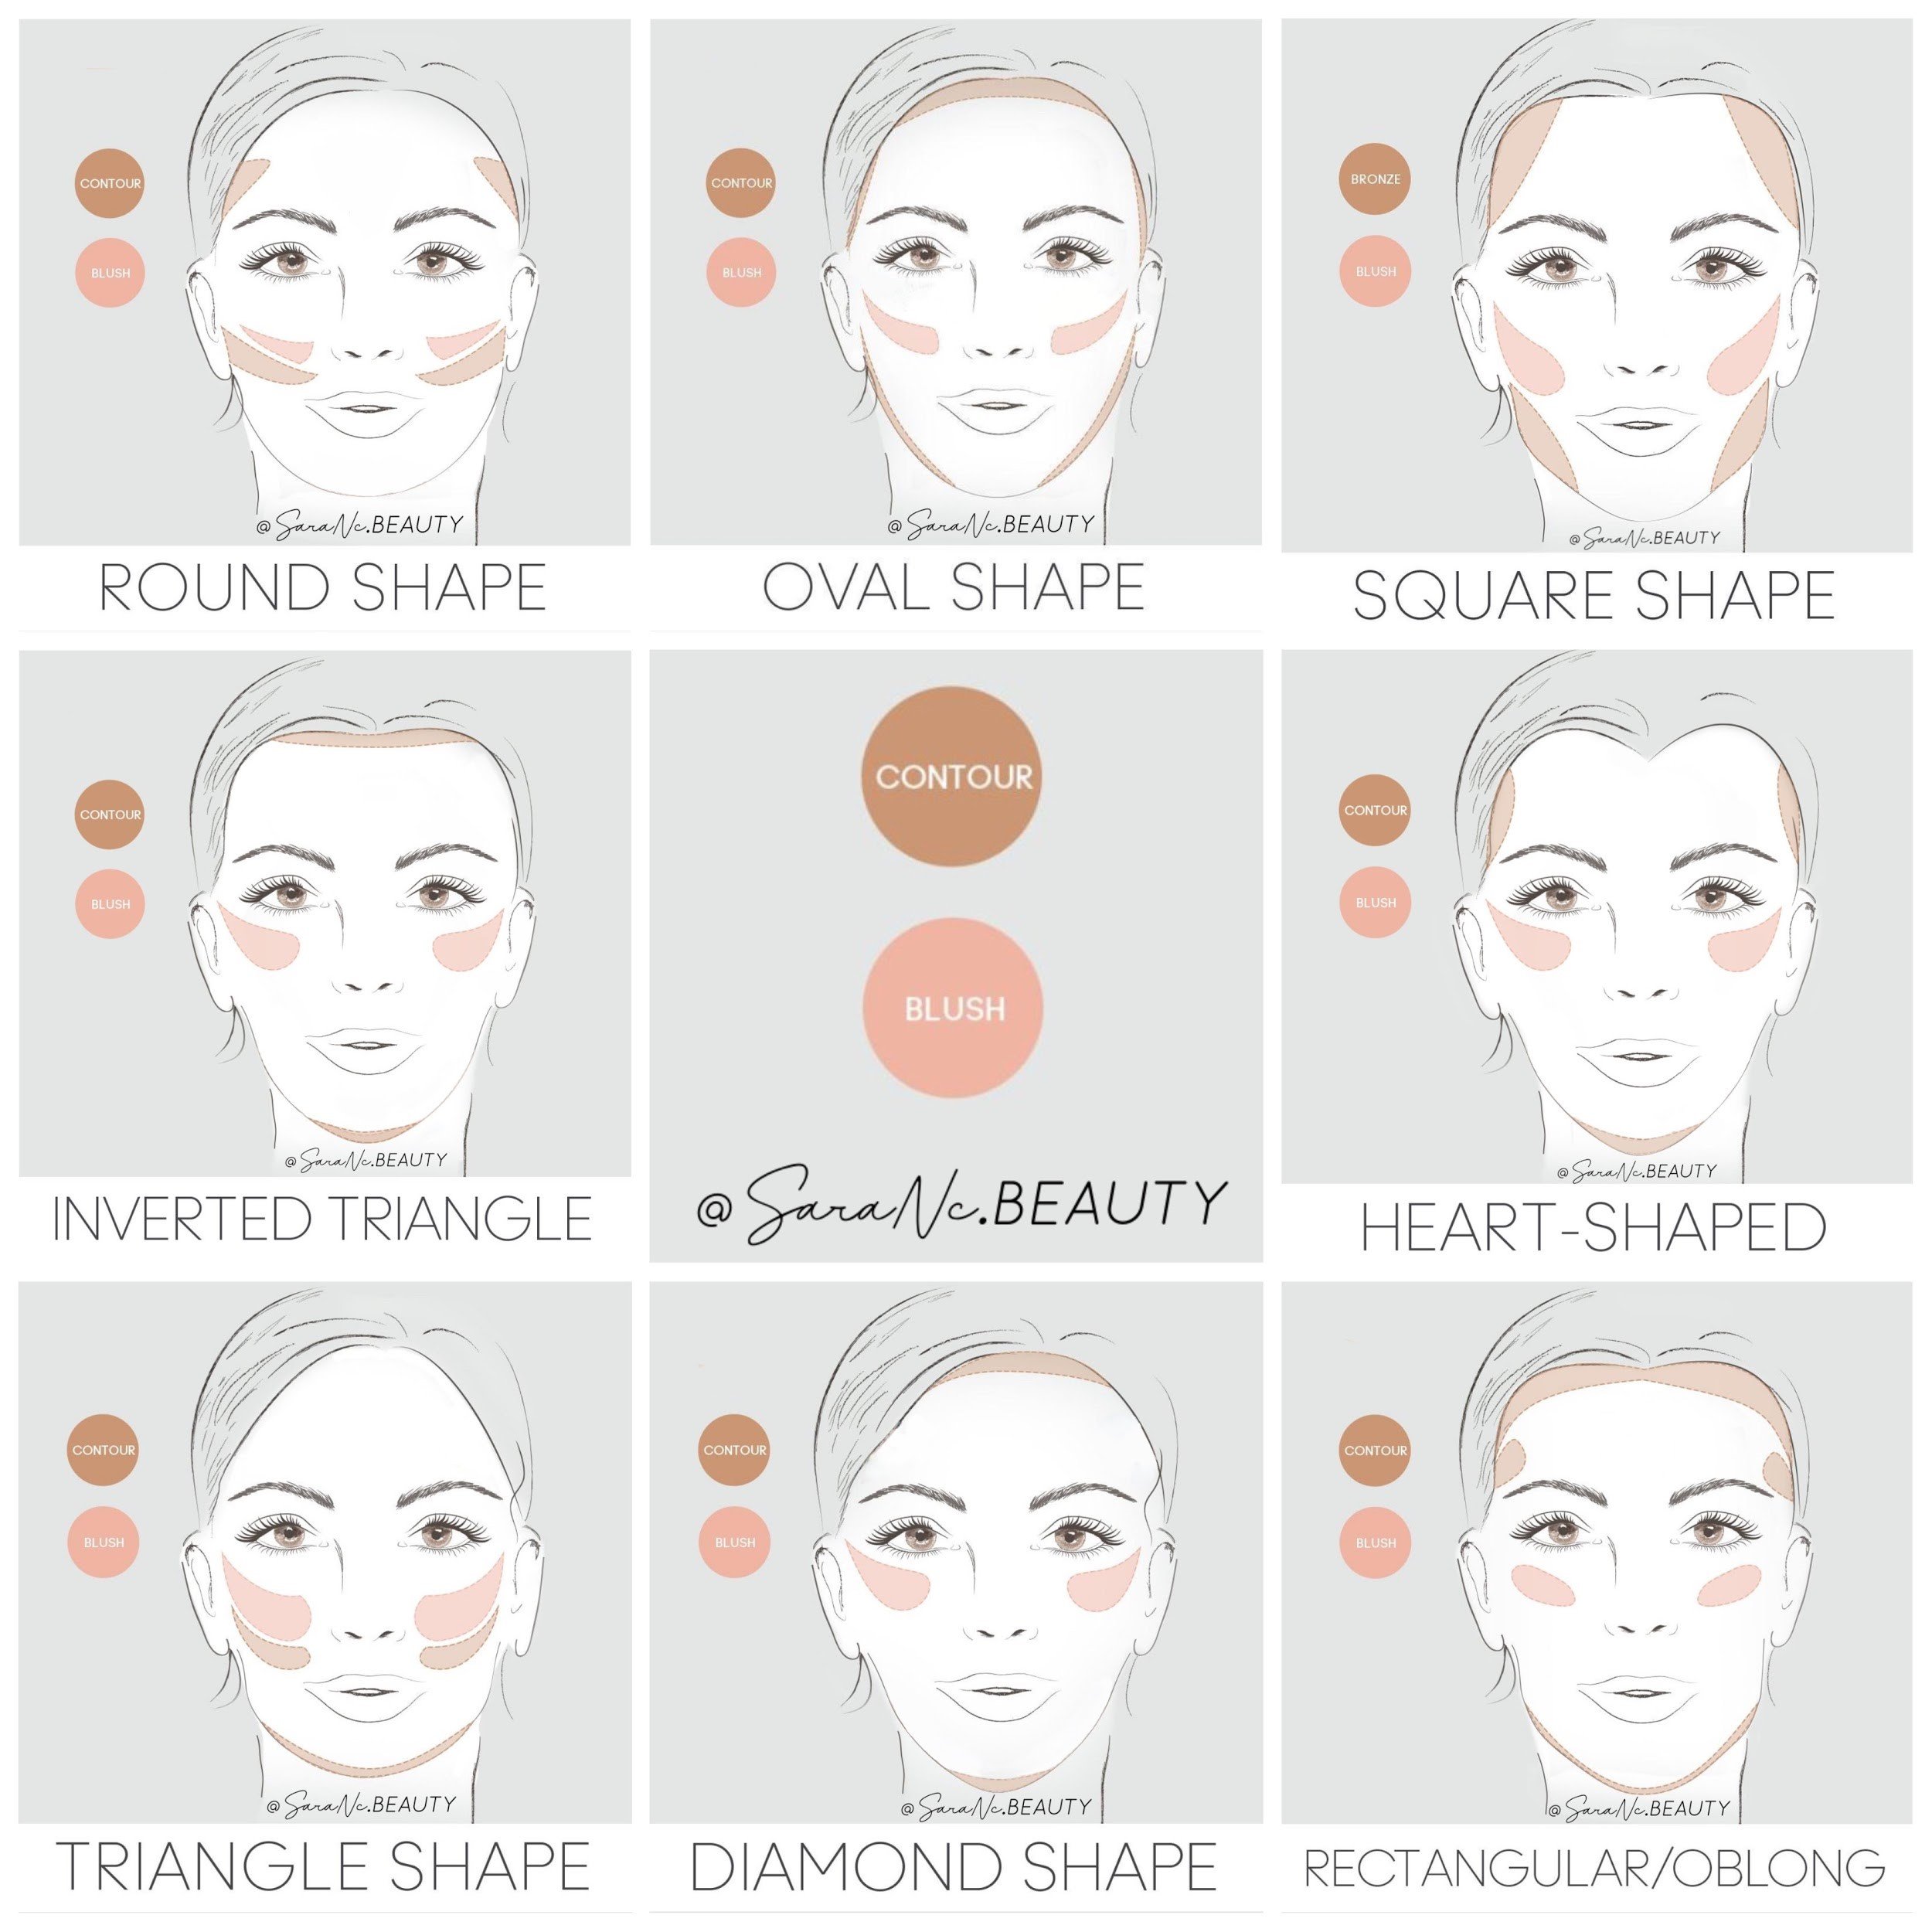
For a quick everyday look, you can pick your favorite soft rosy blush or bronzer that will give you a sun-kissed color. With the right placement of the color, you can draw attention to your features. Check out the right placement for your face shape to make sure the color compliments your face.
 |
Step 4 Simple Eye:
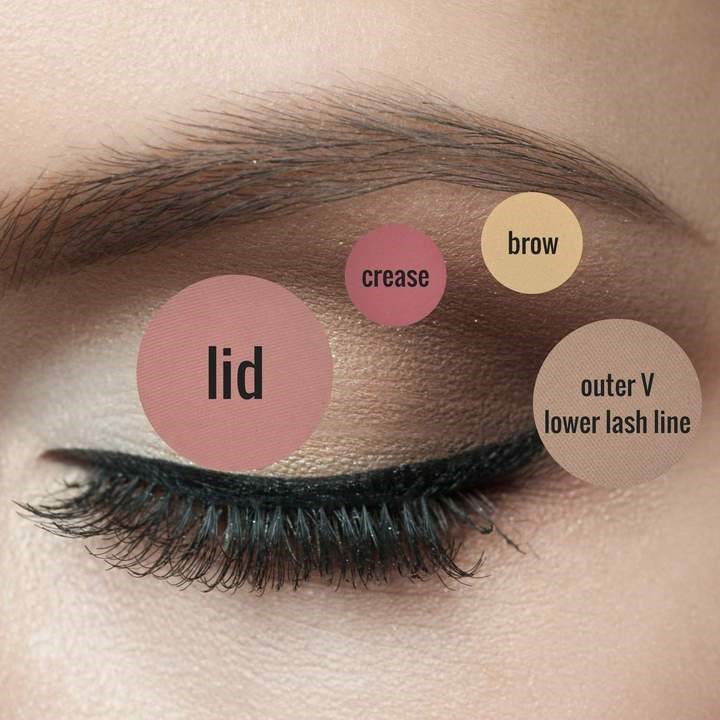
No matter if you're going for a subtle makeup look or a colorful combo, always start with a neutral tone to even out your lid and make a nice blank surface to work from. You can then add a little color to your outer crease to add dimension to your eye to make it appear optically larger. TIP: if you have a hooded eye then go a little above the crease up to your brow. Your eye will appear larger. Then simply blend it in, that is the key! Keep blending for a seamless transition.
Step 5 Lash:
 |
For longer lashes right away, pop on your mascara primer. I know that that's an extra step that you might not necessarily have time for every day, but it only takes a few seconds and after you curl your lashes and add your favorite mascara over the primer you'll instantly get even longer and fuller lashes.
Step 6 EyeBrow:
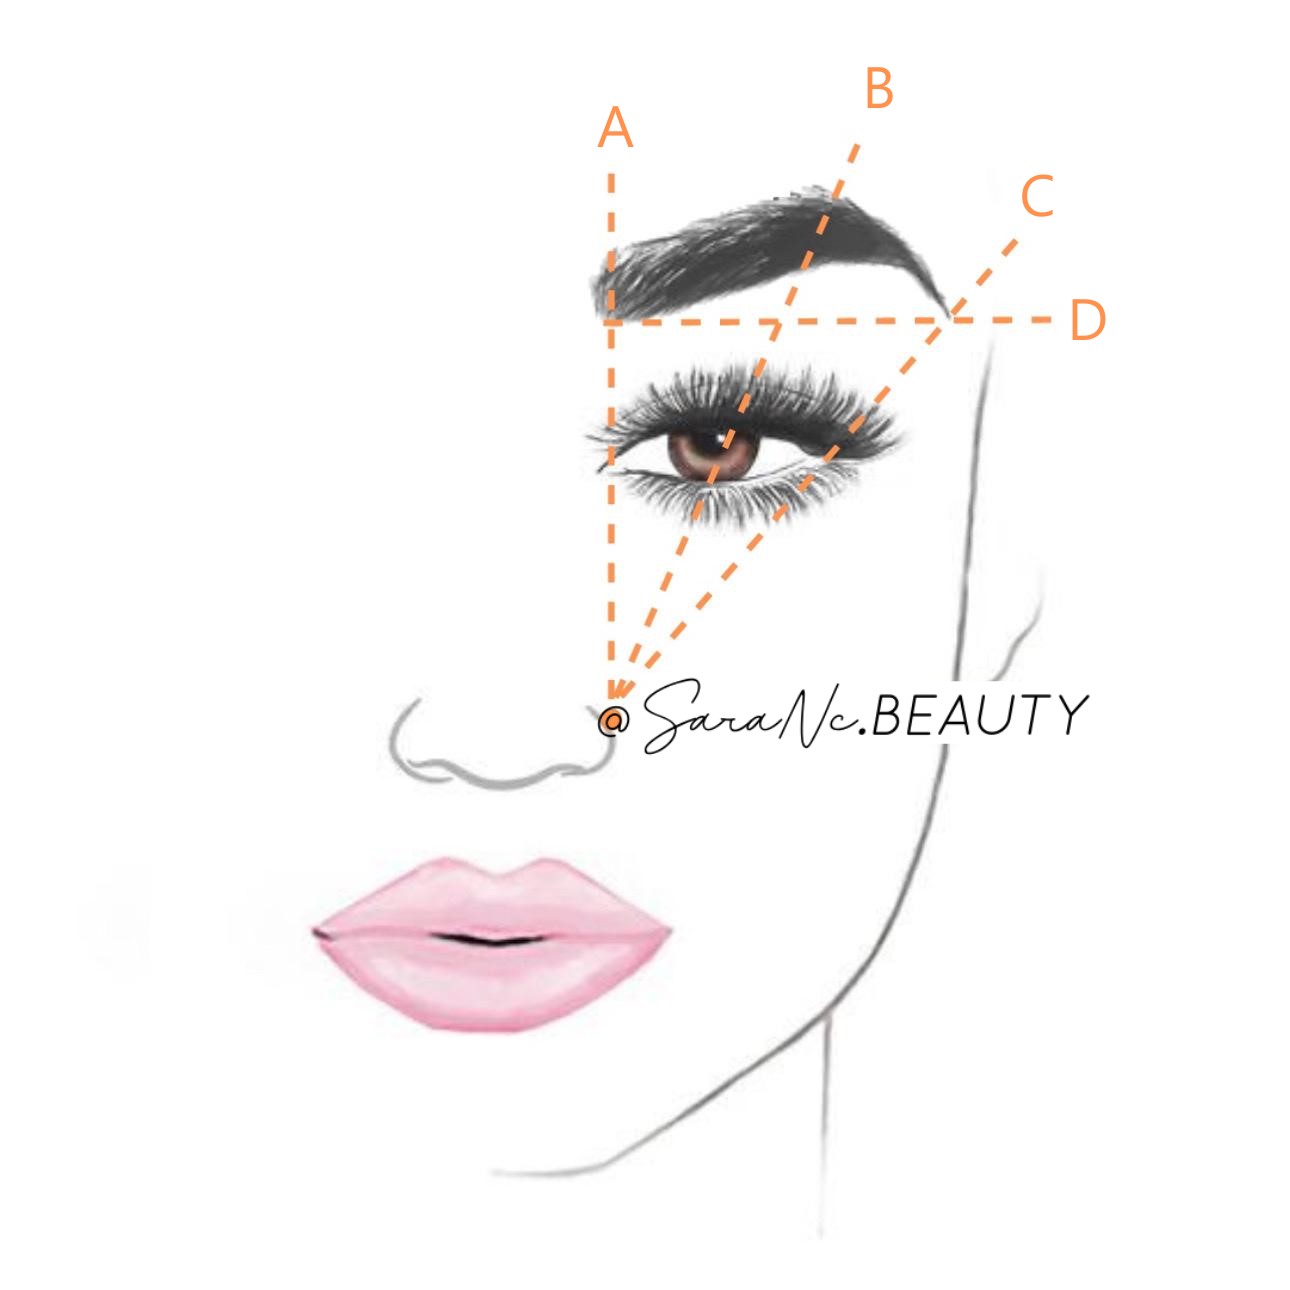
Eyebrows are a big topic nowadays. I could go on and on about this topic and probably fill an entire book. There are many techniques or products that you can use, but let's make it simple. No matter if you're using powder, pencil, or gel, your eyebrows should start in line with your nose and your eye. (line A) The highest point should be in line from your nose through the eye (line B). And the tail should be in line with the other corner of your eye (line C). Tip: if you're shaping your own eyebrows at home be sure you grab your pencil and draw the out the line first before you grab your tweezers. The line could even be black and heavily overdone, but don't worry about that, you'll wash it off right after. Just give yourself a guide to follow that will help you to make sure not to over plug.
 |
Step 7 Lips:
Every lip product and brand has its own application process that you need to follow. If you are using lip liner be sure to match your liner with your lip color or just a slightly darker color. Using too dark a color will make your lips appear smaller. TIP: To make your lips appear larger, apply your liner on the edge of your vermillion border; simply on the outer line of your lip and then fill it in with your favorite color. This will make your lips will look plumper, but be careful not to overdraw too much.

Sara was born and raised in the Czech Republic. In 2012, she moved to the US and worked many jobs but never felt fulfilled, which lead her to share her story and her passion for fitness (former fitness professional), nutrition tips (vegan) and makeup. She is also a new mom. Sara and her husband welcomed their baby boy in June 2020.
Sara is a makeup junkie at heart and decided to start her own business to help women look and feel their best. She loves supporting other business moms feel beautiful inside and out as they work to create their own destinies.
Related articles:
 |  |  |
Macaroni KID Lower Manhattan is the family fun go-to source for the latest and most comprehensive information in our area. Subscribe for FREE today!

