Are you struggling with applying your corrector and concealer? First, determine what you are trying to conceal. Is it a raised bump? An indention such as a scar? Or hollowness under your eyes?
Remember to always stick to the “less is more concept”. Apply the tiniest amount and blend well:
- I prefer using fingertips, as the heat from fingers melts the product into the skin and blends better.
- You can even use a small brush like a concealer brush to apply and a blending brush.
- Apply the corrector first to cancel out any color and then top the corrector with concealer and/or foundation. Finally, top it off with a setting powder to set it. Always apply thin layers as we don't want your makeup to look too cakey, we simply want to make your complexion look flawless.
Tip 1: Synthetic brushes are the most ideal for makeup application because they are not pores like natural hair brushes; they will not absorb any of the product. This is important because you need that coverage for your skin.
Tip 2: Try to avoid concealers that come with their own applicators. These can be hard to sterilize/disinfect and you may end up spreading bacteria from one blemish to create another.
For concealing blemishes, use a tiny brush because it is more precise than a finger. Not to mention, it is also more hygienic.
|
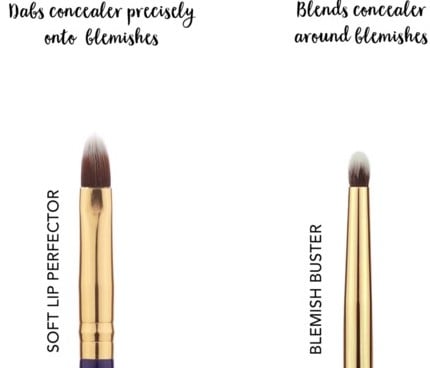
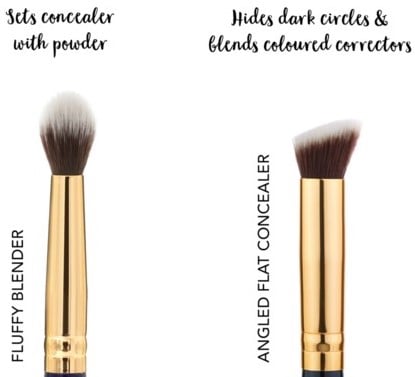
For concealing dark circles or anything bigger than a blemish, use a flat or angled flat brush because it blends concealer into the skin like a dream and makes it barely detectable. And if needed you can always set it with a powder and fluffy brush.
|
Concealing step-by-step
First, remember that good skincare will reduce the need to conceal in the first place. So by taking care of your skin you will have a lot less to conceal!
So in what order should you apply the products? What goes first?
If you don’t need to color correct after you have cleansed, moisturized, and primed, then it's time to apply your foundation. We always apply concealer after your foundation. If you apply it before your foundation, the act of applying the foundation will remove the concealer. Also, since most foundations will do the majority of the concealing for you, applying your foundation prior to concealing can help you use less concealer and apply only where necessary. If you’re in need of color correction then apply your corrector first, let it dry, and then with a stippling motion (bouncing off your skin) cover your corrector with foundation and concealer.
Tip: to conceal blemishes you want the concealer to perfectly match your skin tone.
To conceal dark under-eye, you can use one shade lighter than your foundation to brighten up the area.
Concealing dark circles
How you apply your concealer depends on the coverage it provides.
For medium-coverage: tap the concealer at the inner and outer corners of your eyes, then buff it smooth with a clean and angled or domed brush.
For fuller coverage: similarly, tap the corrector into the inner corners of the eyes or wherever the color is darkest. The difference is the additional step of patting a neutral concealer that is one shade lighter than your skin tone under the whole eye area.
Avoid rubbing the concealer with your fingers as the action wipes the product to the side, leaving the problem area exposed. To make sure concealer stays exactly where you left it, lightly dust the area with a bit of translucent setting powder. Use any small fluffy brush for this step.
Concealing blemishes
For angry red zits, neutralize the obnoxious redness with a green corrector applied directly onto the blemish. A soft precise brush works best for this step. Next, apply yellow-based concealer and feather out the outer edges with a smaller fluffier brush to blend this concealed area with the healthy skin surrounding it. Be careful with this step to avoid covering too much of the good skin around the pimple. You don’t want to create a ‘look at my zit’ bull's-eye. A small, precise, flat brush is what you want for the job as it blends the concealers exactly where you want it. Set the concealer with a fluffy brush dipped in a powder foundation that matches your skin tone (Translucent powder can make a whitehead look shiny and white). Avoid applying too much powder on top or excessively patting the area as this can irritate the zit and may make it look worse if the makeup above it cakes up.
DOS AND DON'TS:
- Choose the right hues for your skin tone. The efficacy of color correctors depends on finding the right tone to match your blemish.
- Apply thin layers! A thick layer of corrector may show through your foundation.
- Don’t use colors that you don’t need. Color correcting concealer is meant to be used only on blemishes that are strong in appearance. For smaller less noticeable blemishes, a regular concealer will do.
- Don’t brush the colors all over your face. This will undo all the hard work you’ve done by moving the pigments into the wrong areas.
Remember that makeup should enhance your skin, not hide it. So think of color correcting concealer as a fun extra step that’s to be used sparingly and don’t forget to let your natural face shine.

Sara was born and raised in the Czech Republic. In 2012, she moved to the US and worked many jobs but never felt fulfilled, which lead her to share her story and her passion for fitness (former fitness professional), nutrition tips (vegan) and makeup. She is also a new mom. Sara and her husband welcomed their baby boy in June 2020.
Sara is a makeup junkie at heart and decided to start her own business to help women look and feel their best. She loves supporting other business moms feel beautiful inside and out as they work to create their own destinies. You could find out more about her HERE.
Related articles:
 |  |  |
Macaroni Kid Lower Manhattan is the family fun go-to source for the latest and most comprehensive information in our area. Subscribe for FREE today and receive a one-year free parenting magazine subscription on us!