Contouring is such a big topic nowadays. Some people love it; some are afraid it can be too much. As always, as a general rule of thumb, less is more. Always! Contours bring out our natural shades and features.
What Is Highlighting and Contouring?
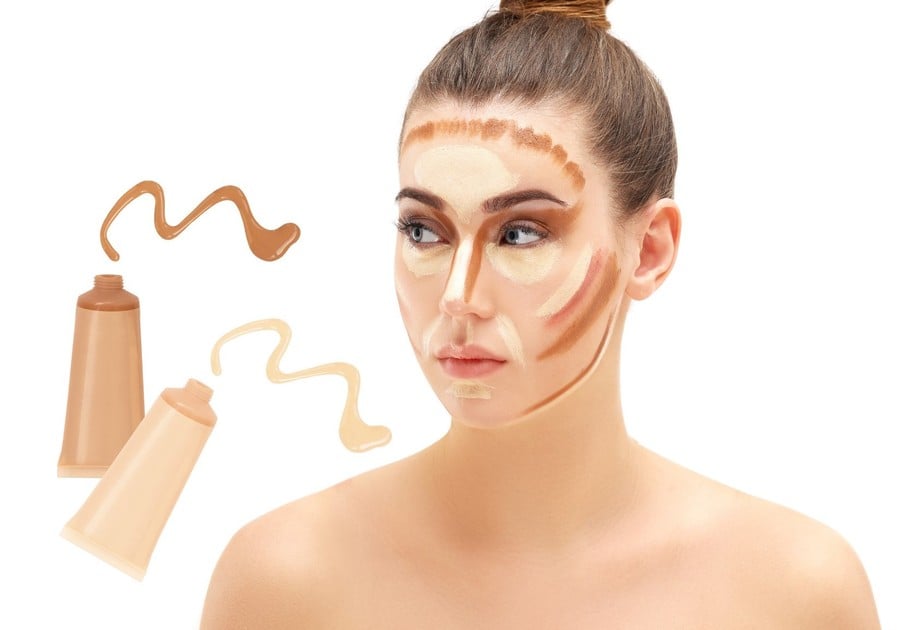
Highlighting and contouring is a makeup technique. Creating light and dark areas to sculpt and define the shape of the face in a subtle manner. Playing with light and dark skin tone colors makes depth on the face as it will look plain right after applying foundation and concealer. This highlighting and contouring technique comes in real handy to give the face more structure and accentuate the cheekbones.
Why Do You Need Highlighting and Contouring?
Think of your face as a slate; You can even out the skin tone and cover the dark circles with foundation and concealers, and in the end, no matter how good your eye makeup and lipstick are, your face will look very one dimensional and flat. The art of contouring is for shaping the face and bringing attention to the different features. You can accentuate your cheeks to bring out the cheekbones, or you can contour your forehead to make it look smaller. Highlighting any area will bring it forward, and contouring will recede. If you are new to this technique and still don’t understand these terms, let me break it further to understand better. Highlighting means applying a slightly lighter shade of product to bring light onto that area, making it look more prominent than usual. Contouring means applying a slightly darker shade, which creates shadows and recedes that area taking away any unwanted attention.
Types of Highlighting and Contouring
Normal Contouring
Traditional contouring technique. After applying primer, foundation and concealer, you apply the highlighting and contouring products.
Reverse Contouring
This technique involves layering skin sculpting products like blush, highlighter, and contour color on bare skin, and then applying foundation.
How To Highlight and Contour Correctly
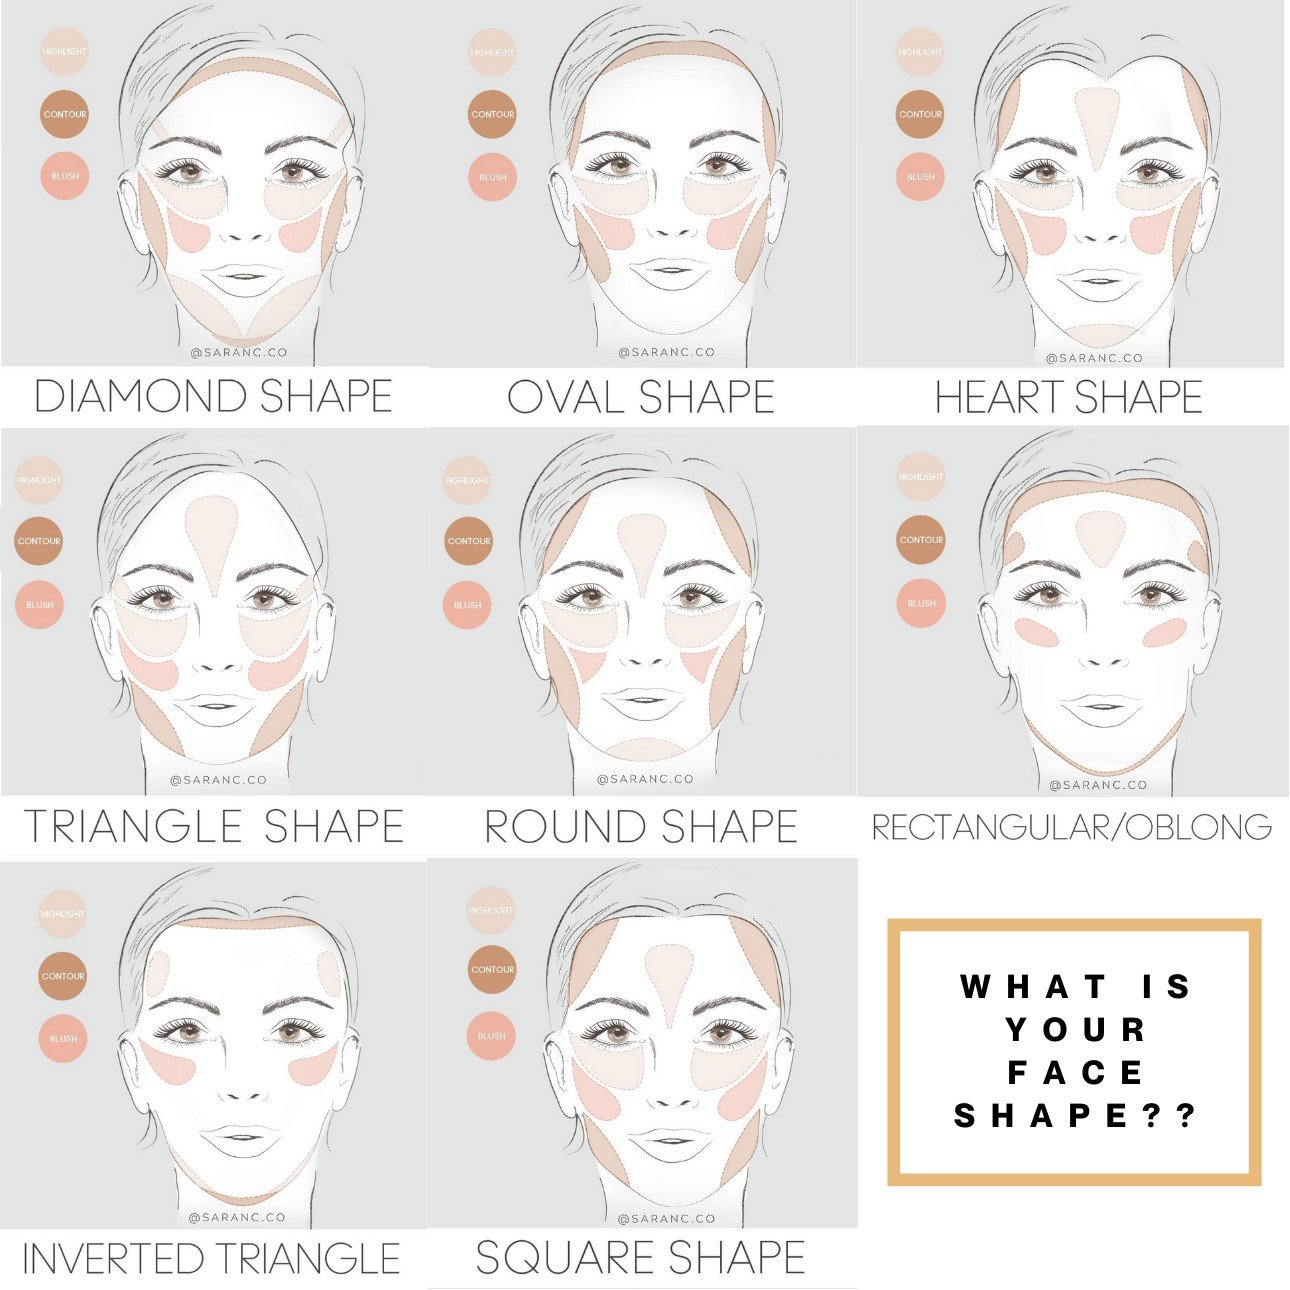
Determining your face shape is the most important factor when it comes to highlighting and contouring. This is not a one size fits all thing. You need to know which area to highlight and which area to contour to bring out the best features in your face. Highlighting the problem area will only make it look worse than it already is; for example, highlighting the double chin is definitely not a good idea. Know your face and work with it for the best results.
Oval: The forehead is at the correct proportion, and the chin tapers with soft edges. For those of you with oval shape, there isn’t much contouring needed.
Round: You have a round chin and wide cheeks that make your face look round. For those of you with this shape, you will need to contour your chin and cheeks along with your forehead to create shadows to give the impression of an oval face.
Square: Very similar to Oval but with a very prominent jawline, sharp cheekbones, pointed chin. You will need to create shadows around the chin for those of you with this shape to soften it.
Oblong: This face shape is the extended version of Oval. All the features are elongated and sometimes end with a prominent chin. You need to contour both the chin and the forehead to de-emphasize the length and bring more attention to the center of the face.
Heart: This shape will have a closer hairline in the center and recedes on the sides, giving it a heart-like shape. Some may also have a prominent jawline and pointed chin. For those of you with this shape, you will need to contour the forehead to take the attention away from the receding hairline, and also, if you have a pointed chin, create shadows to soften it up.
All methods begin with a clean face that has been fully moisturized. When dry, apply the foundation or the BB or CC product (if desired). Definitely prime the face and allow it to dry.
Then do what is known as “mapping” your face. Examine the areas where you would like to create deeper shadows and areas that need to be highlighted to emphasize them. As an example, many highlight the “T-zone” of the face along the bridge of the nose and center of the forehead (but not to the hairline). They also highlight the upper cheekbone, the chin, and even around the jaw.
Mapping also means considering areas that you will want to darken with contouring products. Common areas are along the hairline at the top of the face, at the temples or just above the outer edge of the eyebrow, just beneath the cheekbone, along the jaw, and even narrowing the nose by using contouring product in a fine line on either side of the nose.
How To Choose The Right Shades For Highlighting and Contouring?
This one is pretty easy if you know the undertone of your skin. There are three different undertones: warm, cool, and neutral. Warm undertones mean you will have a yellow tint to your skin no matter how pale or deep your skin is. Cool undertones mean you will have more of a pink tint to your skin. Neutral means it is neither warm nor cool.
Highlighter
Warm Skin: Choose a highlighter that is 1-2 shades lighter than your actual skin tone with warm undertones.
Cool Skin: Choose a highlighter that is 1-2 shades lighter than your actual skin tone with pink or peach undertones.
Neutral Skin: Choose a highlighter that is 1-2 shades lighter than your actual skin tone with neutral undertones.
Contour
Warm, Cool & Neutral Skin: Choose a contour product that is 2-3 shades darker than your skin tone with grey/taupe undertones.
Step-by-Step Contouring and Highlighting Guide:
Step 1: Apply - Now that you have selected your shades of contour ready, apply them onto the face. With your lighter concealer, apply it in the areas you want to bring forward or simply conceal. These areas would be the bridge of your nose, chin, under-eye area, and the middle of your forehead. Next, with your darker concealer, apply it in the areas where you want to add more depth. For most people, these areas would be the sides of your nose, the jawline, the hollows of your cheeks, your temples, and the perimeter of your forehead. Finally, you can also use the darker shade on your jawline. This, when blended, will make the jawline look more prominent and chiseled.
If you are using a cream-based concealer, then apply it using fingers or brush, and if you are using powder concealer, then you can just use a brush.
TIP: If you are a beginner, I would recommend you to add both highlighter and concealer subtly on one side of the face and a little more prominent on the other. This way, you can experiment on how much will suit you, and you can mix and match to get the perfect contours and highlights for your face.
Step 2: Blend - Now that you have added contour lines, whether stick or powder, it’s time to blend it in. The key here is to keep the core of the shade almost intact while blending out the edges, so it gradually blends to the foundation shade (After all, no one has exact line contours unless it is for a cartoon or Halloween makeup). For cream concealer, I would recommend using a buffing brush or sponge, while for powder concealer, you can just use the same brush you used to apply the concealer.
Step 3: Set the makeup - Now, if you have used liquid or cream product to contour, you will need to add a dab of translucent setting powder to set it into place so it won’t easily wipe or fade off. If you are using a contour powder, then you can skip this step.
Step 4: Highlight - Highlighting is, as the name suggests, highlight the parts of the face to make it more prominent. This can be your cheekbones, bridge and tip of your nose, chin, cupid’s bow, and above your temples by your eyebrows. Depending on the makeup style, you can even highlight the inner corners of your eyes and your brow bone. Again as with contouring, there is no one correct way of highlighting, and everyone will have different results so I recommend you to experiment by applying on the other areas of your face and seeing the result. For me applying just above the cheekbones, on the bridge and tip of the nose, and cupid’s bow suits best. Always start from the subtle highlighters, and once you find the perfect areas to highlight, then move up to the intense ones to experiment.

Sara was born and raised in the Czech Republic. In 2012, she moved to the US and worked many jobs but never felt fulfilled, which lead her to share her story and her passion for fitness (former fitness professional), nutrition tips (vegan) and makeup. She is also a new mom. Sara and her husband welcomed their baby boy in June 2020.
Sara is a makeup junkie at heart and decided to start her own business to help women look and feel their best. She loves supporting other business moms feel beautiful inside and out as they work to create their own destinies. You could find out more about her HERE.
Related articles:
 |  |  |
Macaroni Kid Lower Manhattan is the family fun go-to source for the latest and most comprehensive information in our area. Subscribe for FREE today and receive a one-year free parenting magazine subscription on us!